

How to Fix your Ford MFD Low Display not working
A faulty factory navigation display can affect the driving experience and make it difficult to use the vehicle's original infotainment system. Common problems include a black screen, white screen, flickering images, horizontal lines, and missing pixels.
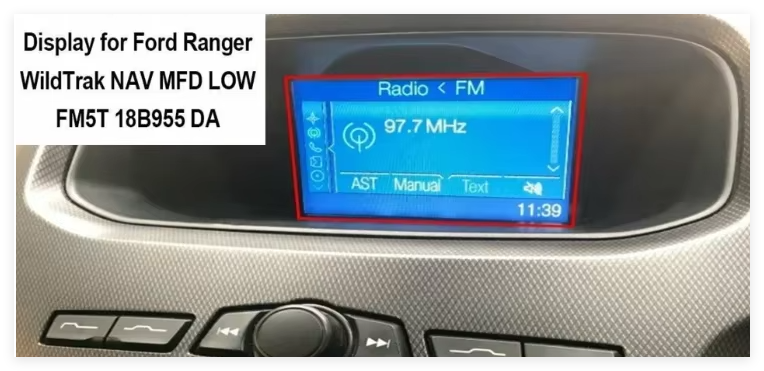
For selected Ford factory navigation systems, the Sharp LQ050T5DG01 is a 5-inch non-touch LCD panel used as a replacement display component.
However, not every display problem means the LCD panel needs to be replaced. Before purchasing a replacement screen, it is important to identify the actual fault and confirm the correct LCD model.It can help you save a lot of money and also retain all the settings of the original car system.
This guide explains how to diagnose common Ford navigation screen problems, identify a compatible replacement LCD, and avoid common installation mistakes.

1. Common Ford Navigation Screen Problems
An aging or damaged automotive LCD panel may develop several types of display faults.
Here are some common symptoms technicians may encounter.
1.1 Black or Blank Screen
The navigation system appears to power on, but the display remains black.
Possible causes include:
-
LCD panel failure
-
Backlight failure
-
Loose or damaged display cable
-
Power supply problems
-
Faults in the radio mainboard
A black screen does not automatically mean the LCD panel is defective. The power supply and backlight should also be checked.
1.2 White Screen
The display turns completely white after the radio system starts.
Possible causes include:
-
LCD panel damage
-
Poor FPC cable connection
-
Display signal problems
-
Faults in the display control circuit
Check the display connector and related circuits before replacing the LCD.
1.3 Horizontal or Vertical Lines
Lines across the screen can make navigation information difficult to read.
Possible causes include:
-
Damaged LCD panel
-
Internal panel connection failure
-
Display signal problems
If the lines remain after checking the connections and signal source, the LCD panel may need replacement.
1.4 Flickering or Unstable Display
The screen may flicker, become dim, or display an unstable image.
Possible causes include:
-
Unstable power supply
-
Backlight circuit problems
-
Loose connectors
-
LCD panel deterioration
Technicians should inspect the power and connection circuits before deciding which component needs replacement.
1.5 Cracked Screen or Missing Pixels
Physical damage may result in black spots, colored lines, missing pixels, or distorted images.
If the LCD panel itself is physically damaged, replacing the defective display is usually necessary.
Step 1: Check Whether the Radio System Powers On
Start the vehicle and check whether the original radio or navigation system starts normally.
Pay attention to:
-
Radio startup behavior
-
Audio output
-
Button and control functions
-
Whether the system responds normally
If the entire radio system fails to start, the problem may not be limited to the LCD screen.
Step 2: Inspect the Display and Backlight
Check whether the display produces any visible image.
If the screen appears black, inspect the backlight and its power supply. A backlight problem can produce symptoms similar to a defective LCD panel.
Step 3: Inspect the LCD Connector
Carefully inspect the display cable and connector.
Look for:
-
Loose connections
-
Bent or damaged contacts
-
Torn or damaged flexible cables
-
Corrosion or contamination
Always follow the vehicle manufacturer's safety and disassembly procedures.
Step 4: Check the Display Signal
If the radio system powers on and the connector is secure, the display signal and related circuits may need further inspection.
A qualified technician can use appropriate testing equipment to determine whether the fault comes from the LCD panel or the radio mainboard.
Step 5: Confirm Whether the LCD Needs Replacement
If the power supply, backlight, connections, and display signal have been checked and the panel is confirmed defective, replacing the LCD may be the appropriate repair.
Correct diagnosis helps avoid replacing a good screen when the actual problem is elsewhere.
3. How to Identify the Correct Replacement LCD Model
Choosing the correct replacement screen is one of the most important parts of automotive display repair.
A screen with a similar appearance or size does not necessarily have the same electrical interface or compatibility.
For selected Ford navigation display assemblies, the Sharp LQ050T5DG01 is one replacement model to check.
LQ050T5DG01 basic specifications:
-
Model Number: LQ050T5DG01
-
Brand: Sharp
-
Screen Size: 5.0 inches
-
Display Type: TFT-LCD
-
Resolution: 400 × 240 pixels
-
Touch Function: Non-touch
-
Signal Interface: 40-pin FPC
-
Display Application: Automotive display systems
Important Compatibility Checks
Before ordering a replacement LCD, compare the following details:
1. Original LCD Model Number
Check the label on the original display. Confirm whether it is marked LQ050T5DG01.
2. Screen Dimensions
Compare the physical dimensions and active display area.
3. Connector Type
Check the FPC connector, pin count, cable arrangement, and connector position.
4. Touch Function
The LQ050T5DG01 is a non-touch LCD panel. It should not be confused with a touchscreen digitizer or a complete navigation assembly.
5. Vehicle and Radio Version
Different vehicle years, equipment packages, and factory radio versions may use different display components.
Do not rely on the vehicle model alone to confirm compatibility.

4. How to Replace a Ford Navigation LCD Screen
The following is a general repair workflow. The exact removal and installation procedure depends on the vehicle and radio assembly.
Professional installation is recommended.
Step 1: Prepare the Replacement Screen and ToolsBefore starting, prepare:
-
Correct replacement LCD panel
-
Suitable trim removal tools
-
Appropriate screwdrivers
-
Anti-static protection
-
Clean working surface
Verify the replacement model and connector before disassembling the radio.
Step 2: Disconnect the Vehicle Power
Follow the manufacturer's service instructions for safely disconnecting the vehicle battery or power supply before working on the radio assembly.
This helps reduce the risk of electrical damage during disassembly.
Step 3: Remove the Navigation Display Assembly
Carefully remove the necessary dashboard trim and radio display assembly according to the vehicle-specific service procedure.
Avoid forcing plastic clips or pulling on wiring harnesses.
Step 4: Remove the Defective LCD Panel
Open the display assembly carefully.
Locate the LCD flexible cable and release its connector using the correct method. Avoid pulling directly on the cable or damaging the connector latch.
Remove the defective LCD panel without putting pressure on the surrounding components.
Step 5: Install the Replacement LCD
Position the replacement screen correctly.
Check that:
-
The panel is correctly aligned.
-
The FPC cable is fully inserted.
-
The connector is properly secured.
-
No cables are trapped or bent sharply.
Step 6: Test the Display Before Final Assembly
Before reinstalling all trim and covers, reconnect the necessary components according to the service procedure and test the display.
Check:
-
Normal startup image
-
Display brightness
-
Image clarity
-
Color and display stability
-
No unexpected lines or blank areas
Confirm that the display works properly before completing the assembly.
Step 7: Reassemble the Navigation Unit
Once testing is complete, carefully reassemble the display housing and reinstall the radio unit.
Make sure all connectors and mounting points are secure.
5. Common Mistakes to Avoid During LCD Replacement
Even when the correct replacement screen is selected, installation mistakes can cause additional problems.
Here are several important points for repair technicians.
Mistake 1: Ordering by Screen Size Only
Two 5-inch LCD screens may have different connectors, signal interfaces, and dimensions.
Always check the original model number and connector.
Mistake 2: Damaging the FPC Connector
Flexible cables and their connectors are delicate. Excessive force during removal or installation may damage the connector or cable.
Mistake 3: Installing a Touchscreen Instead of a Non-Touch LCD
The LQ050T5DG01 is a non-touch display panel. Confirm that your original assembly uses this type of screen.
Mistake 4: Reassembling Without Testing
Always test the replacement screen before completing the final installation.
This helps identify connection or display problems while the assembly is still accessible.
6. Where to Find a Replacement LQ050T5DG01 LCD Screen
If your diagnosis confirms that the original LCD panel is defective and the model number is LQ050T5DG01, choosing the correct replacement component is the next step.
OPURADIO supplies automotive LCD displays, navigation screens, touch panels, and car radio repair components for repair shops, technicians, distributors, and wholesale buyers.
Our service includes:
-
Strict product testing before shipment
-
100-day warranty
-
Orders generally dispatched within 3–7 days
-
Competitive wholesale pricing
-
Compatibility assistance before ordering
If you are unsure whether the LQ050T5DG01 is suitable for your original navigation display, send us photos of the original screen label and connector.
Our team will help you check the model before you place an order.
Product: Sharp LQ050T5DG01 5-Inch Non-Touch LCD Display
Contact Email: spring@opuradio.com
View the LQ050T5DG01 Replacement LCD Product Page:
Conclusion
A faulty Ford navigation display can be caused by several different issues, including LCD panel damage, backlight failure, loose connectors, or radio mainboard problems.
Accurate diagnosis is essential before replacing any components.
For compatible factory navigation systems using the Sharp LQ050T5DG01, confirming the original model number, connector, and display type can help technicians choose the correct replacement LCD and reduce installation problems.
For automotive repair shops and wholesale buyers, OPURADIO provides replacement LCD screens and compatibility support for automotive display repairs.
-


